I am on a quest to learn how to build physical things.

Working in the digital realm is fun, but it is nowhere near as hard and impactful as what can be done in the physical world.

I spent a few weeks improving my skillset across firmware, computational geometry, fullstack and robotics.

See my GitHub & website for more details.

Here's what I got done each day:


May 1, 2025
Two roboroaches successfully deployed. Jack and Jill. The stimulation worked some of the time, they adapted quick and the effect wore off. I learned animal husbandry, surgery, and implanted BCIs into living beings. This concludes this series of experiments.
April 30, 2025
Built a full-stack shipwreck search app that lets users look up famous wrecks like the Titanic and instantly get historical summaries, using the Wikipedia API behind the scenes. The backend is a FastAPI server deployed on Render, which queries Wikipedia and logs search data to Supabase.

At first, I had issues because I deployed the root project instead of just the frontend (in the shipwreck-frontend folder), which led to 404 errors on Vercel. Once I redeployed from the correct directory and updated the API URL in my frontend, everything worked. I also set up a custom domain at shipwreck.gracegerwe.com by pointing my DNS records to Vercel.

April 25-28 had commitments in LA.

April 24, 2025
I have begun cockroach BCI experiments. The goal is to control where they go via an app on my phone. Welcome to the fam, Jack, Jill and Amy!

Both Jack and Jill successfully underwent surgery, Jack moreso than Jill. Tonight, they are recovering, and the results will be tested tomorrow. Amy is our control for now. Surgery consisted of attaching 3 electrodes to each roach, one to each of their antennas, and one to a small hole in their shell which will serve as "ground". This is a very useful exercise to learn animal husbandry and surgical procedure.

April 23, 2025
Learnt about how to turn a blob of metal into a part. Covered process engineering concepts including takt time, how to structure and scale a production line, different kinds of metals/alloys, forming, casting, molding, machining and joining processes.
April 22, 2025
Talked to two leading spinal cord stimulation academics. Was very dissapointed with the lack of urgency from one of them. The other was extremely competent and explained that a μECoG implant in the brain will definitely be what the field progresses towards, in addition to just the spinal cord stimulator. This is because on its own, the spinal implants have very basic stimulation algorithms, as walking is a predictable, repetitive movement. But if you want anything more complex, such as standing, leaning, shifting, etc, a brain chip is necessary to switch between those functions fluidly.

He also explained the mechanism of action for the current spinal cord stimulators and that the only company that is really trying to commercialize this in Switzerland has merely 16 channels on their stimulator.

April 21, 2025
Assembled second arm of the robot. Did a deep dive on treasure hunting (pun intended). There is $200 billion on the ocean floor that no one has bothered to pick up or discover. Main barriers seem to be primarily legal - you have to get deals with governments to make sure they don't lay claim to all of it once you bring something up, and that you get a fair share.
April 20, 2025
Researched marine animal BCI applications. 75% of the worlds oceans are unmapped - we've mapped more of Mars! We're missing out on massive opportunities in food, medicine, minerals, and treasure. Some possible ideas are putting cameras / sensors on whales or sharks and using their natural migrating patterns to get better maps. Challenges would be power and signal transmission.
April 19, 2025
Spent the day researching spinal cord stimulation and giving paralysis patients the ability to walk again. Then had dinner with a friend & he had the crazy idea to put BCIs on octopi for marine exploration. Kept me up all night.
April 18, 2025
Removed gear from half of the servos. Assembled the leading arm of LeRobot. 3D printing additional parts.
April 17, 2025
Linked yesterday's algos to a visualization tool with Three.js and React.
April 16, 2025
Worked on 3D shape feature extraction algorithms. Details confidential.
April 15, 2025
Added fault injection and detection logic, including actuator jamming, watchdog-style logic and input parsing. Expanded to multi-actuator sequencing.
April 14, 2025
Built a simple control loop in C that moved a simulated actuator from position A to B using a state machine with idle, moving and fault states.

Replaced hardcoded actuator logic with a HAL.

Learned how to structure deterministic logic in embedded-style firmware and how to organize testable, scalable code.

April 13, 2025
Installed LeRobot software and configured all 12 servos. This meant connecting the servo bus to the computer, and then one by one manually running a script for each servo assigning it an ID.
April 12, 2025
All LeRobot equipment has arrived by now, Sully & I have been 3D printing all of the components.
April 11, 2025
Flew back from London to SF. Read Head Cases cover to cover. Very gripping, you should read it.

Also learned about self replicating robots & the future of fabrication. Most interesting insight was how much robotics can pull from biology: the birth of computerized digital manufacturing was 4 billion years ago, with the ribosome. That is the little robot that makes all of the components that make up the big robot (us)! And ribosomes also makes more ribosomes.

The building blocks for all of life are 20 amino acids. There should be the same for manufacturing. There needs to be, if we want to get to mars without a crazy amount of luggage.

I am now very glad that I majored in molecular biology.

April 10, 2025
Today I built a tool to simulate CMM flatness probing using least squares plane fitting and point sampling from STEP geometry — visualized in MeshLab.

Woo! Many fancy words! Let's break it down.

The program loads a STEP file, finds faces, samples points on that face as if it were a probe, calculates a deviation, and then exports a report explaining whether the surfaces was within the allowable deviation or not (pass/fail). That is what you do in CMM tolerancing. The program also exports a .ply that you can visualize! So you can see it! With your eyes!

This time I started extremely simple and then built up, rather than make the mistakes of the dreaded black screen visualizer where I went too complex.

First we set up CMake to use my local OCCT build. Had some minor compile errors but they were a super quick fix as I've had them before.

Then we loaded my trusty Servo Horn STEP file, downloaded & set up MeshLab. Initial script was literally: find one surface, put a neat 10x10 grid of probes on it in a defined bounding box, and give it a position on a 3D plane.

Once that worked and I confirmed the STEP loaded, sampling worked, and the file exported well, then I included a feature that doesn't just pick a rectangular bounding box on a flat surface but actually correctly probes across that entire surface, showing its true shape.

Then, I added a loop that went through every single surface on the file, took the 5 biggest ones based on surface area, and exported all of those at the same time into MeshLab. That way I could visualize the actual servo horn.

Finally, once I had that, I incorporated eigen math to fit a best-fit plane for the 5 biggest faces, computed their deviations and color-coded them, green = pass, red = fail.

And voila! A real CMM tool built from scratch in one day.

April 9, 2025
Decided to try a different visualizer tool & succeeded in building it!! Even if I fixed the black screen bug, MacOs is not easily integrated with Qt and OCCT. For that black screen problem, a number of things could have been wrong.

For example perhaps initializeGL() was happening too early, a mistake that happens when the valid handle is returned only after the native widget is created.

Or, the viewer never actually attaches to a real OpenGL surface and is just rendering to an offscreen buffer, then blitsing to the screen, whereas OCCT assumes it's rendering directly to a native window, causing the redraw not to show.

Either way, I found a repo online called Foxtrot and decided to use that instead. Downloaded and configured Rust, spent some time trying to figure out how to deploy the library onto Github.

First tried using GitHub pages, got bogged down, then tried CloudFlare, which was also acting up, and then I went back to square 1 and thought: what is the easiest possible thing I could do?

That thing turned out to be directly deploying the Web app on my computer (aka creating a Docs folder and copying all of the Wasm folder into there) and then pushing it to GitHub.

And it worked!! Yayyy!!! See demo above, repo here.

April 8, 2025
Spent the whole day trying to fix the black popup bug, unsuccessfully. Tried many, many things, including linker errors, build issues, context failure, initialization, and more.

At first, the view was null in painGL(), meaning my OCCT view was not being correctly assigned. I fixed that, but it did little.

I also looked into the rendering time, tried adding a frame buffer and many debugging prints in between, some of them timed, and succeeded in making the screen flash the correct thing more often, but still the baseline was black.

April 7, 2025
I got the visualizer to build properly! The stream of errors was caused by Cocoa_Window needing objective C. Instead of incorporating that into my build and cluttering it all over again, I decided to just switch to Open_GL and Qt's native window that's already directly supported by OCCT CT.

Once I made that switch, then it was just missing symbol and class redefinition errors. Had to add a few headers, reconfigure the CMake a bit to include Qt6 libraries, updated inheritance across files, and then... could build, but got a runtime crash.

The app crashed on launch, even though it built and linked, because viewer->loadSTEP() was called in the constructor before OpenGL was ready, so context was still nullptr. Just had to delay loadSTEP().

After some final cleanup, it builds and shows a black popup. When I expand or shrink the window with my mouse, you can see the STEP file inside - otherwise, the screen is black. But it's getting closer! Yay!

April 6, 2025
Today I got feature extraction working from real STEP files and set up CAM toolpath logic! Below is the breakdown of the steps (pun intended).

First learned how STEP files are set up and the type of information that's in them: everything is written in EXPRESS, and each line starts with a # and a number, and refers to a piece of information about the object (a line, surface, hole, etc). Basically, information on each component and how they are meant to be assembled together.

It took me quite a while to be able to read STEP files properly. Ran into mainly compiler issues, trying to read source files as executables, for example. (Source code is the human-readable instructions written in a programming language like C++, while an executable is the machine-readable program created by compiling that source code so the computer can run it.)

The main issue turned out to be goofball MacOS sandboxing my terminal & VSCode, aka not giving it permission to access my Downloads. Just had to change my settings and... voila! 1 solid, 1 shell, 61 faces, 168 edges and 112 vertices :)

After that it was very easy to analyze full shape hierarchies, create a new struct, find feature locations in 3D space, clean up the CLI (command line interface) output, and begin to generate CAM operations based on feature characteristics.

Some of the classes/enums I used were BrepAdaptor_Surface, TopExp_Explorer, TopAbs_FACE, TopoDS_Shape, GeomAbs_SurfaceType, UVBounds() and .Value(u, v).

THEN I decided I needed something a bit harder and got started on a visualizer - a 3D application layer so that I could render and see the toolpath, not just output lines on my terminal.

Initial setup was pretty easy, I installed Qt via Homebrew and linked it with OCCT in my CMake file. I also added logic for two different executables, and additional .cpp and .hpp files to support the new popup screen. But then again I had to wrestle with quite a few errors.

Specifically, WNT_Window was Windows only and it broke the build on my MacOS. Cocoa_Window(disp, winID) gave constructor mismatch, so I tried multiple things, like changing it to NSView and using Aspect_Window. I was able to solve this error, but was getting a stream of symbols instead of a proper build.

April 5, 2025
Was extremely jet lagged as I hadn't really slept in 48h. Slept pretty much the entire day.
April 4, 2025
Landed & surprised my brother, he's directing & starring in his first play in a public theatre. He's 15. I come from a family of overachievers.
April 3, 2025
Spent 10h flight to London watching a ton of YouTube videos on manufacturing, the history of machining, how metals are structured & CNC machines. Did you know that factories in the US used to be the center of the community? They used to have picnics, host events, etc.
April 2, 2025
Got totally nerd sniped and spent the morning rewriting my personal website. Looks simpler, cleaner, with more accurate information.

Afternoon was a looooong debugging session. Main goal was to continue to set up the C++ computational geometry libraries that I want. Went through quite a few problems.

First I realized that the OpenCascade version I'd installed from homebrew didn't have the libraries I needed. So I uninstalled that version and had to rebuild the geometry engine from the source.

Downloading OpenCascade from the website from 2.5GB, so I first tried to download only the parts of it that I needed to support CAD/CAM/GD&T logic but leave out a GUI, OpenGL, viewers and doc system that would take up uneccessary space.

The build succeeded, but when I ran make install it failed midway because it expected FreeType headers (for GUI/fonts), which weren’t installed. So I deleted the build and started over with more specific CMake instructions to specifically avoid that.

Then, once make install worked, I was still getting IntelliSense VSCode errors, and tried multiple things to troubleshoot the C++ add on, even creating an additional .json file.

Then I accidentaly ran rm -rf on not just the build folder but the entire project github repo and deleted everything like an idiot. And I hadn't pushed it.

So I had to rewrite everything, & then I had different errors with VSCode not finding specific libraries (TKSTEP especially). What came next was 3 more times of deleting and redownloading OpenCascade from the OG repo, each time downloading more of it until I downloaded the entire 2.5GB file. But even once I did that, it still couldn't find TKSTEP. I tried compiling with TKDESTEP instead and it worked.

April 1, 2025
Set up GitHub repo structure (models/, src/, main.cpp, bin/, etc). Installed CMake and wrote CMakeLists.txt file.

Learned about different compilers (Clang, GCC, Visual Studio) and configured Clang because I use Mac, it’s preinstalled, will produce faster & more optimized binaries, and has better diagnostics (error & warning messages).

Spent a loooong time trying to solve a bug wherein the compiler couldn't find OpenCascade header files (specifically gp_Pnt.hxx).

Some approaches I took were: verifying that files existed, manually setting the include and library paths, reconfiguring VSCode IntelliSense, rewriting the .json files, adding fallback include paths, testing manual compilation, etc.

What ended up working was changing the include statement in the main.cpp/ file. A tiny and simple fix that took a long time to get to and was so satisfying in the end.

March 31, 2025
Set up dev environment for CAM, to take my CAD files to the next level.

Installed Fusion360, CadQuery & a CadQuery GUI Editor. The Editor looked like it was from 2007. In the process downloaded and learned how to use Conda, and then realized that CadQuery is just a Python wrapper around OpenCascade.

Downloaded OpenCascade and wrote C++ in VSCode.

Exported a STL file from Waffle Bot's Onshape environment into Fusion 360, converted it into a mesh, and simulated 2D Pockets & Contour (wow this is so cool).

Exported the toolpath as g-code, read it in VSCode, and visualized it in NV Viewer!!

March 30, 2025
Waffle Bot Spent 4h organizing my flat and unpacking everything I hadn't unpacked since I moved. Environment makes a huge difference. It was a mess and took way longer than I thought but now it looks sick. Yeah, I can lock myself in here to build 24/7 😎

Added details and entries for the last week on this site. Went through 3 iterations to implement proper image, bullet point and paragraph formatting. It took time to compile all of the information into the log, it will go so much faster in the future as I just update it daily.

3D printed the leverage robot arm so that I could study it in real life. (It had the STL but not the STEP files so I couldn't really see what was going on.)

March 29, 2025
Most of the day was spent debugging servo connection to the Raspberry Pi. After battling with improper grounding, dead or zombie servos, power starvation and weak jumper wires, I was able to wire a DC power supply to the servos that survived (RIP 4 HS-311s that I probably broke by twisting them around too much during assembly). Now I know how to diagnose low/no current draw conditions, debug power delivery with a bench supply, PWM logic and signal grounding.

Even with a few servos working with the extra power supply, they were still too weak to move the arm. I spent the rest of the evening looking at other robot models to base my redesign off of. I found one that uses servos at the base + a lot of leverage, and decided to use that one as my example for v2.

I designed servo hats for MG995s, two versions of a v2 arm component, and 1 version of the v2 base.

March 28, 2025
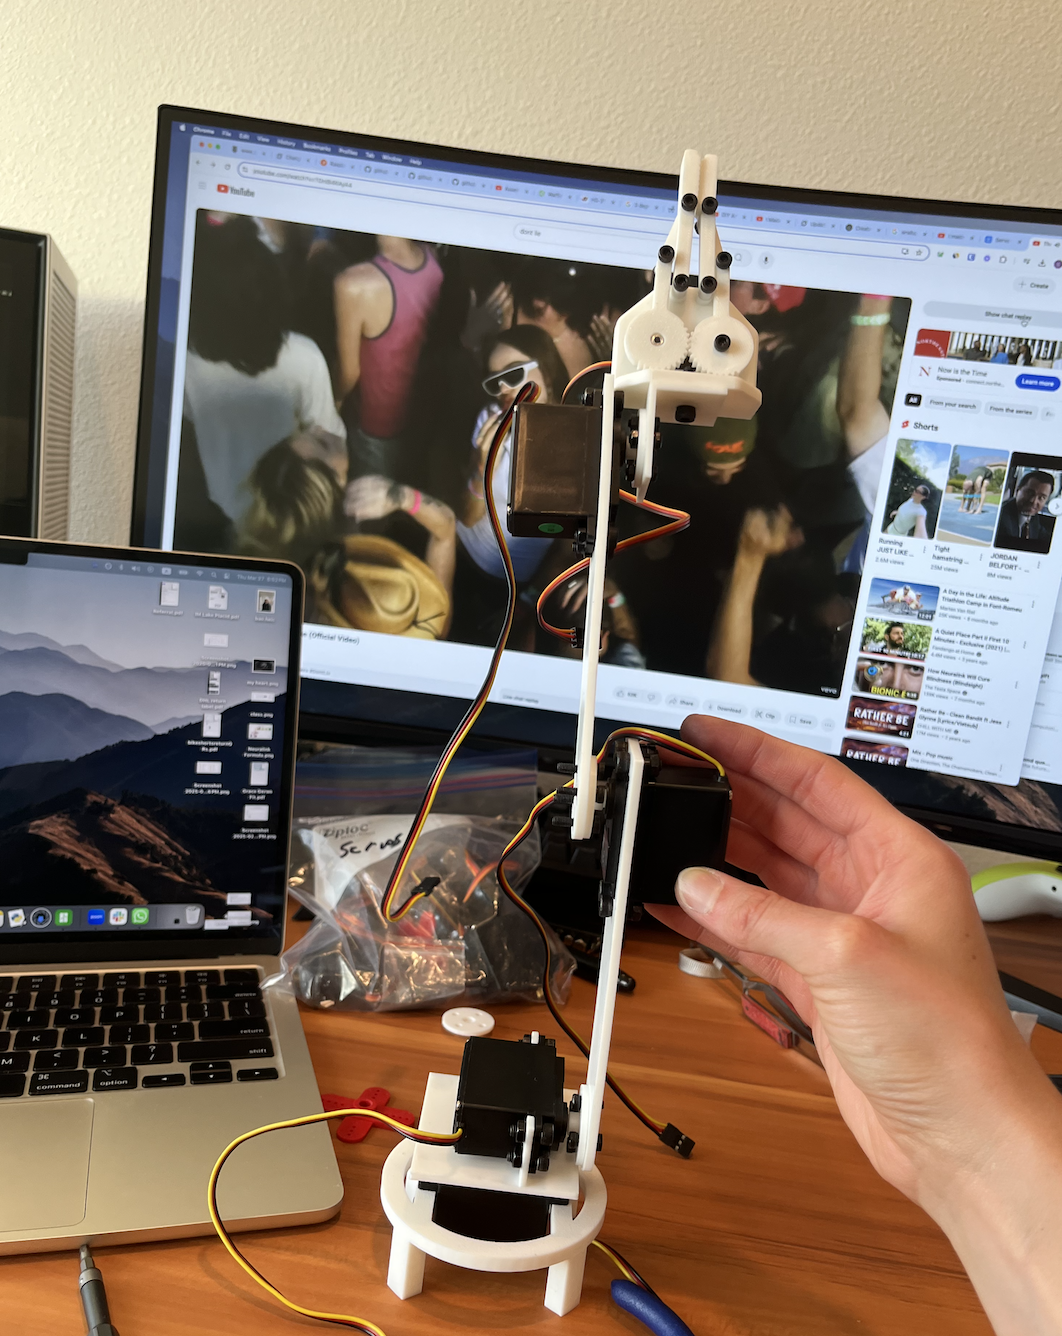
Finished first full version of the WaffleBot, assembled and connected it to the Raspberry Pi, and found that the HS-311 servos did not have enough torque / arm was too heavy so they couldn't lift it up properly.

Also spent 3.5h in the morning at a contract manufacturer seeing every step of the PCBA process, including BOM, procurement, SMT assembly, stencil printing, pick-and-place, ovens longer than my bedroom, through-hole, optical inspection and more.

This CM sets themselves apart by always shipping their products on time and having a rework rate of <0.1%. For reference, most CMs have rework rates in the mid-double digits and are regularly 6-8 weeks late. The guys I visited are of the highest caliber.

Their trick is to have tests and checks at every single step of the process. It is actually not adding more work - it saves time and money by catching mistakes as early as possible.

My host had been brought in to increase efficiency of the factory by automating as much as possible. I haven't met anyone with more integrity or craft. He carefully explained to me the parts of the process that need to be done by hand, and others that could be automated. He let me sit in on meetings where he trained his team and developed software towards these goals. The most curious thing I noticed was that he always asked how much time something took, and his employees responded down to the minute, usually between 2-15.

March 27, 2025
Found a different gripper online, 3D printed and assembled it, designed the wrist joint and mount that it would attach to.

Ordered additional M1 screws for horns and sticky soles that I can add to the robot base to make it even sturdier.

Discovered the mirror tool in CAD which makes my 2D drawings so much faster.

March 26, 2025
Am finding locking a bit difficult. So far am designing all of the components with holes for screws and manually screwing them in with hex nuts on the other side, but sometimes the parts are so small that it gets inconvenient to attach them. Don't quite understand yet how to drop a lock nut into a print / make threaded inserts, but I don't think I'll need that for this version.

Designed and added the first part of the arm to the assembly.

Also designed the elbow and second arm part.

March 25, 2025
Learned how to design parts in context and import STEP files of specific components from the internet. Also learned fasten/revolute mates and made my first assembly.

Learned how to make holes in CAD. Game changer.

Built v2 of the Waffle Bot base, this time not just a cubic block of PLA with a rectangular cavity in it (lol) but one properly optimized for sturdiness, attachment to the servo and quick 3d printing. Also designed my own servo horns because I didn't have small enough screws for the ones that came with my servos. Went through 3 versions. Was able to create ridges that attached onto the servo perfectly.

March 24, 2025
I had pain in my hip which turned out to be a torn labrum so I spent the last few days in the hospital / battling with insurance / getting ortho advice / recovering. So the last few days are blank but now I'm back!

Sketched out how Waffle Bot needs to look like and made some measurements relative to the size of the toaster and a waffle. Realized 3DOF will make it very hard for Waffle Bot to pick up waffles so I started working on a 5 DOF design.

March 18, 2025
Read up on DOF and studied how others have built their robots. I decided I want to start as simple as possible with 3 DOF.
March 17, 2025
Got bogged down trying to assemble the servo gripper before realizing the print was missing two parts. Even after printing those wasn’t able to assemble it, turned out that the stl design was faulty and the holes for screws and hex nuts were size mismatched. Don't trust the internet I guess.
March 16, 2025
Downloaded and set up Raspberry Pi environment. To do that I first pinged RPi via local host name on my network, then via IP address.

Set up shortcuts to be able to securely SSH instantly. Used ZeroTier to connect my Pi to a network ID, generated a new private & public key, renamed the RPi localhost and set up passwordless login. Set up first test .py and .txt files.

Printed a servo gripper off the internet and 1/4 of all LeRobot components and then realized I don’t have the right motors or a few other pieces. Ordered them, but some parts will take ~2 weeks to arrive. Decided to design my own robot from scratch.

March 15, 2025
Assembled my BambuLab 3d printer!